- Details
- Written by: INsane
- Category: CSS HUD and GUI Modification
- Hits: 23121


 Start here to learn about modifying the Counter-Strike:Source HUD !
Note that the "GUI" is separate from this. Updated for the new SteamPipe release April 2013.
Traditionally CSS players describe the GUI, (Graphic User Interface) as the Main Menu area where the options, server and create game panels are. The HUD, (Heads Up Display) is described as the game panel area. The information below is a good starting place for the GUI and the HUD.
Reading this first is critical if you want to make a set of files that work, boring to start with but needed... sorry but that's how it is !
NOTE: Want to cheat a little?
Instead of you editing the files why not see the result now and just look at the tutorial and read the files as you go....
download the finished package up to step 5.
You will need to understand how the game folder works in steam games first. Navigate to...
64 Bit systems...
C:\Program Files (x86)\Steam\steamapps\common\counter-strike source\cstrike\
32Bit systems...
C:\Program Files\Steam\steamapps\common\counter-strike source\cstrike\
The game folder has some files in it now but not all the ones you need. Steam games used GCF file format in the past. This has now been replaced by the VPK file format assisted with "loose" files, (files that cannot work through the vpk format like .ttf fonts) in the game folder.
The VPK file we need is located at...
64 Bit systems...
C:\Program Files (x86)\Steam\steamapps\common\counter-strike source\cstrike\cstrike_pak_dir.vpk
32Bit systems...
C:\Program Files\Steam\steamapps\common\counter-strike source\cstrike\cstrike_pak_dir.vpk
You need to use a special file viewer and extractor to look inside and extract files from the VPK file. You can go here and find out about GCFScape before you continue, or if you think you have a good handle on it get GCFScape now install, and have a play with it. Basically you use GCFScape to look into the vpk file and browse the files inside, if you need one just select and extract or just drag and drop the files or folders out.
You would have looked at the cstrike_pak_dir.vpk now and found the "cstrike" folder, ("cstrike" is named "root" inside the viewer) and all the files and directories under it. You may have noticed it looks the same as the game folder structure...with more files and folders.
Important SteamPipe note, the "custom" folder is now the "cstrike" folder ! : In the pre SteamPipe game folder we used to just insert the changed files into cstrike\resource or scripts or materials, that is now changed. We now need to insert ALL files changed into ... cstrike\custom\tut_hud ...or what ever name you like under the custom folder.
If you make a new folder, name it anything you like in the custom folder, that folder you made is now the same as the cstrike folder, just follow the same folder structure as "cstrike" and files in there will work.
Why did they introduce the .vpk ? The reason is in the readme in the custom folder, the GCF format had a huge loading time, the VPK format does not. The custom folder complicates things a liitle but there are benefits...
There are some new "rules" too.
How do I make a .vpk?
To effect a change and customise the HUD we need to get the standard files out of cstrike_pak_dir.vpk and into the cstrike\custom\tut_hud folder. Don't be messy and extract the whole lot, it is not required, lets just get what we need. You will have to make some folders in your cstrike\custom\tut_hud folder first. The basic structure is...
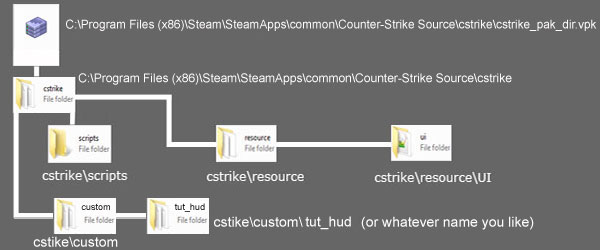
Note the cstrike\custom\tut_hud folder, you need to place all your files to edit in the "tut_hud" folder, that is where they will work best!
The folders to make inside the "tut_hud" folder are "resource" and make a "ui" folder inside the resource folder. Then the "scripts" folder. Now you can extract or drag and drop the files from the cstrike_pak_dir.vpk ...
resource folder... clientscheme.res
resource\ui folder... scoreboard.res
scripts folder... hudlayout.res and hudanimations.txt
There are more you can use and edit but these four files are the backbone of any custom HUD.
clientscheme.res will allow you to edit colors and backgrounds, position of the Counter-Strike:Source logo on the main screen, fonts and boarders.
hudlayout.res is a file that holds background and icon positions and sizes, some major panel positions, sizes and backgrounds, font names.
hudanimations.txt is a file that animates items in the HUD, it also has a few colors that need to be edited to match your changes in the clientscheme.res
scoreboard.res is just for the scoreboard, many small items can be moved, re-sized and colors changed, font and background edits are also possible.
The edits to those files need their own section each, lets continue with what you need to edit them.
The files need a good text editor, please do not use good ole' windows NotePad, it is not up to the task and I will mention "line numbers" in the tutorial, a good text editor will count the rows in a document and label them automatically, helps when you go to find a line in a 6000+ row text document.
What you need is a freeware text editor, for Windows I recommend NotePad++. Download it here.
Linux and Mac OS take a look at "Kate". To get the line numbers to show and disable "dynamic word wrap"...
Windows NotePad++ only... Now you have it installed you can associate .res type files and .txt files. Right click on a .res file, "Open with..." Browse to find Notepad++.exe, usually in "C:\Program Files (x86)\Notepad++\notepad++.exe" make sure you click the tick box "Always use the selected program to open this kind of file". Do the same for the .txt files.
Now you are set up, open the clientscheme.res, notice the numbers beside each row? Now go to the end of the file, see what I mean about finding things? Not all files are as bad as this, but using this with my tutorials will save you heaps of time.
The limits are many, you just can't change some items with the game folder files. That's a big part of customizing HUD's and GUI's, knowing where things are and what the limits are. Take it from me, you can spend hours on looking for a way to alter the color the CSS icons in the kills and deaths in the top left, orange is the color, there is no way to change that unless VALVe change the .dll files to allow changes.
That is repeated again and again, however you can affect change and sometimes when VALVe does update...they give you a new adjustment here and there, the scoreboard is a example of that, lots of new adjustments but try and make it like it was... not possible :)
While the limits of the files you found in the cstrike_pak_dir.vpk may seem depressing don't worry there are heaps of little tricks you will learn to get around things.
Remember I said you could not adjust the orange color of the kills and deaths icons? That's true but you can open the clientscheme.res, adjust the font settings (the little images in there are actually fonts) to have a white wash that turns them lighter, or a dark outline, you can make them "Bolder" or Normal just like other fonts. So you can see the more you know, the better you will be at editing.
There is another method a lot of people overlook, the cstrike_pak_dir.vpk is not the only place you get things from.
Say you want to adjust the Netgraph font and size, you grab the file, scorcescheme.res, out of...
C:\Program Files (x86)\Steam\SteamApps\common\Counter-Strike Source\hl2\resource
Place it in cstrike\custom\tut_hud\resource folder, edit it and bingo, it is changed. Have a quick peek at this article and you will see how this is done.
This concludes the basic information on GUI and HUD editing tools and basic set up. Next are more articles, one about doing a basic recolor, say a classic blue HUD.